
Quick Setup Guide:
Create an email address with your domainWelcome to PolarisMail! This guide will take you from a fresh sign-up to sending your very first email using your own domain (like [email protected]). We have designed this to be easy, even if you have never managed a domain before.
Setting up your professional email should be straightforward. This guide will walk you through simple steps to get your domain connected and your mailboxes ready.
This quick guide applies to both Basic and Enhanced mailboxes.
What You’ll Need:
-
- A domain name (example: yourcompany.com)
- A PolarisMail account (free trial or active subscription)
STEP 0: Sign Up
Create your PolarisMail account and choose how many mailboxes you need. You can:
- Start with a free trial
- Add Basic or Enhanced mailboxes
- Upgrade anytime from the Billing Panel
Expected result:
✅ You have access to your Admin Panel
STEP 1: Log in to the Admin Panel
Log in to the Admin Panel with your username (or signup email) and password.
Expected result:
✅ You see the Admin Panel dashboard
STEP 2: Add your Domain
Add your domain in the Admin Panel:
- Go to Domains (left menu)
- Click New
- Enter your domain (example: yourcompany.com)
Important: Do NOT include http://, https://, or www.
Expected result:
✅ You see the domain in the list. It will be highlighted in red until you verify ownership.


STEP 3: Verify Your Domain
To confirm you own the domain, you’ll add a small verification record.
What to do
- Click the red Verify icon next to your domain
- Copy the TXT record details shown:
-
- Type: TXT
- Name/Host:
mx-verification - Value: (provided token)
-
- Add the record to your DNS
- Wait a few minutes (can take up to 1 hour)
- Click Verify again
Where to do this: Log in to your domain registrar’s website (where you bought your domain, such as GoDaddy, Namecheap, or CloudFlare) and find the DNS Management section. Add a new TXT record with the unique code provided in your PolarisMail Admin Panel.
Important: This step does not impact your current email service. You can safely perform this check while still using your old provider.
Expected result:
✅ Domain is no longer marked in red
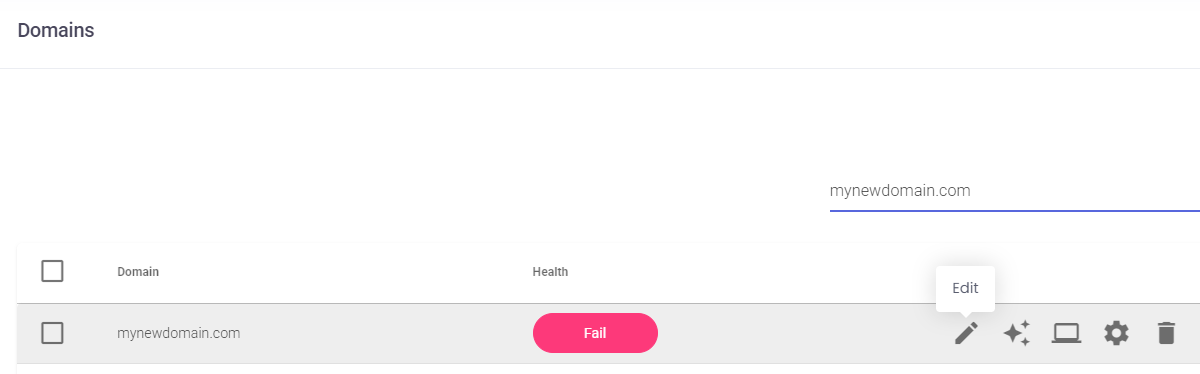
✅ Domain Health: Click on the health button next to your domain (displays Fail because the DNS was not updated, but it’s expected until you update them). Status shows Enabled


STEP 4: Create a new Email address
You can create your email now, even before DNS is complete. From your Admin Panel:
Create the mailbox
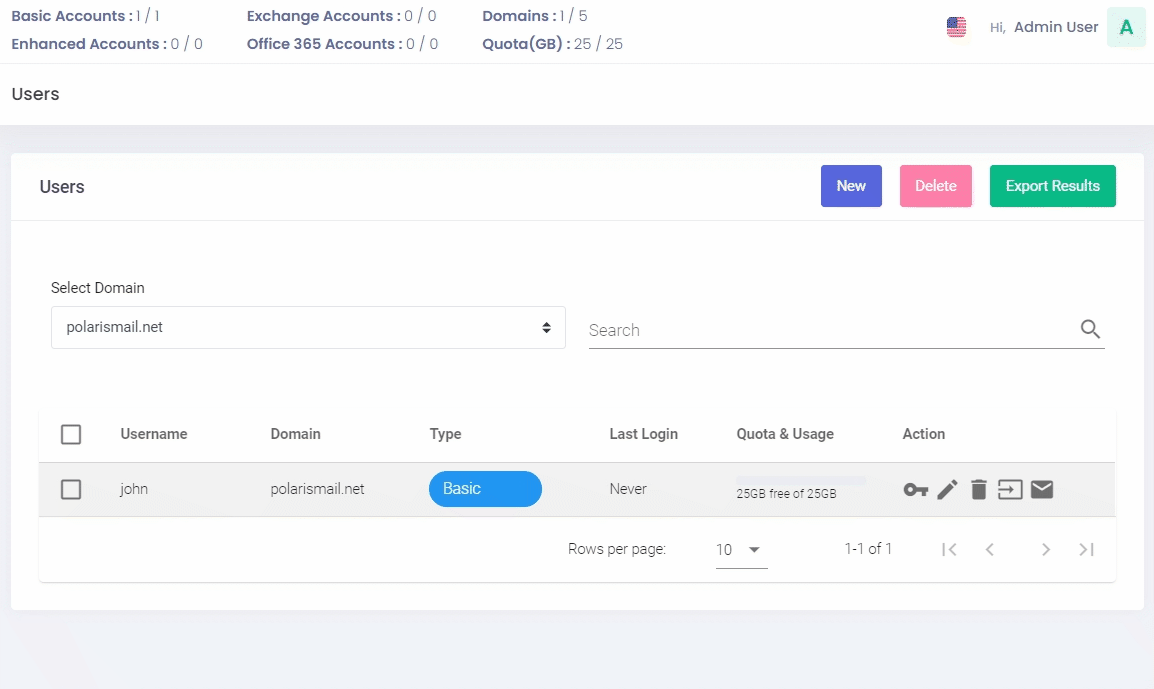
- Go to Users
- Select your domain
- Click New
- Fill in:
-
- Account Type: choose Basic or Enhanced, depending on what type of mailbox you have added to your subscription at Step 0. If you need more accounts, update your subscription from the Billing Panel.
- Username: your desired email address (before “@” sign). You can use letters, numbers, and dots; special characters are not accepted.
- Domain: choose the domain from the drop-down.
- Password: strong password; minimum 8 characters and at least one lower case, one upper case character, one number, and one symbol.
- Name of User: the full name.
- Quota: the size of the mailbox, in GB; you can type in any value between 0.1 and 200. The size must be smaller than the available storage space. Can be updated anytime
-
- Optional: click on the More Options link.
-
-
- Language: the default is English.
- 2Factor Auth: if you want to allow a second layer of authentication, called Two Factor Authentication, for this email account – the default is Allowed.
- Localization: the default timezone for this email account.
- Date Format: the default format for dates.
-
- Finish: click the Add User button.
✅ Your email address is created (example:
[email protected])
Note: Your email won’t receive messages yet – this will start working after Step 6. But you can log in to your Webmail and look around.


STEP 5: (Optional) Migrate Your Existing Emails
If you’re currently using another email provider, you can move your existing emails to PolarisMail.
Your inbox stays exactly the same:
- All emails are transferred
- Folder structure is preserved
- You can continue where you left off
Please follow our full migration guide here and request the migration through our support team.
Expected result:
✅ Your emails are copied to PolarisMail
✅ No interruption to your current email during the process
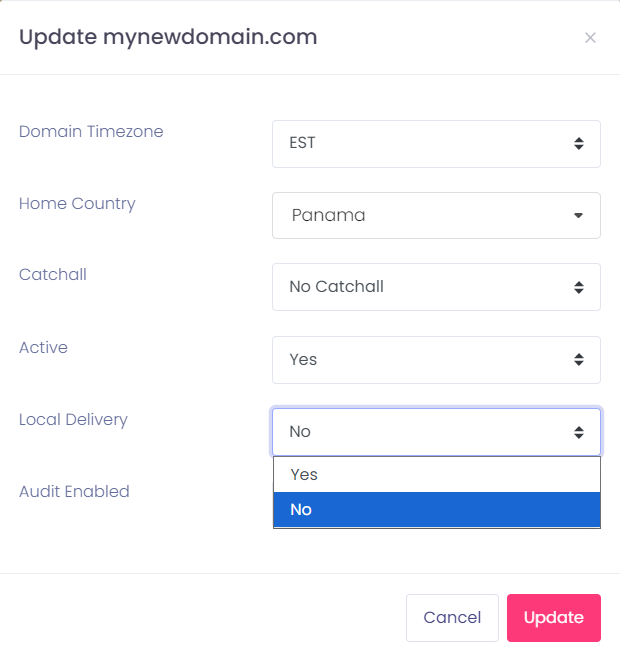
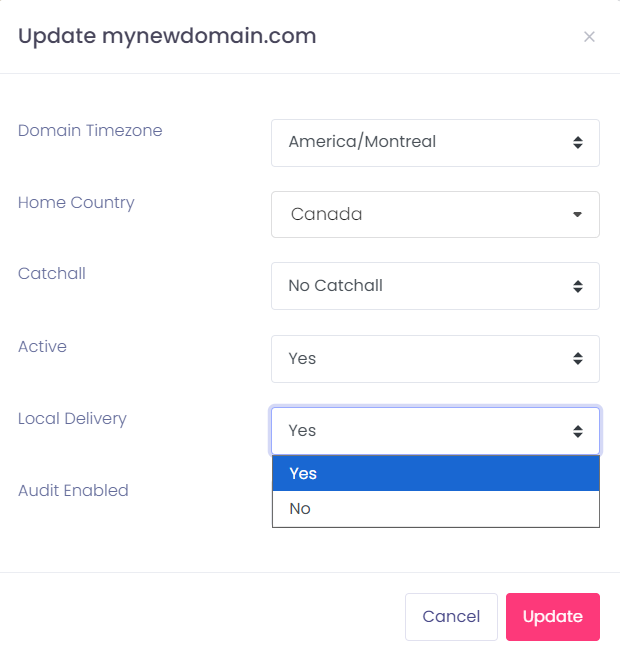
Click here for steps to update Local Delivery
STEP 6: Connect Your Domain (DNS Setup)
View DNS settings
If you are an experienced user, click here to view the DNS settings.
This step activates your email. You’re telling the internet: where your email should be delivered and which servers can send email for your domain.
🛑 If you’re planning to transfer your mailbox from your previous provider to our service, you can wait to make these changes after we complete the email migration.
Where to do this
Log in to your domain provider (where you bought your domain or manage DNS), such as:
- GoDaddy → DNS Management
- Namecheap → Advanced DNS
- Cloudflare → DNS tab
6.1. MX records (Required)
These records tell the internet to deliver your mail to PolarisMail.
- Remove all old MX records first, then add:
| Type | Name / Host | Value | Priority | TTL |
|---|---|---|---|---|
| MX | @ or yourdomain.com | mx.emailarray.com | 5 | 3600 |
| MX | @ or yourdomain.com | mx2.emailarray.com | 10 | 3600 |
Click here for steps to update Local Delivery
6.2. SPF Record
This prevents your emails from being marked as spam. Authorizes us to send emails on your domain’s behalf and prevents bad actors to send emails on your behalf.
- If you don’t have an SPF record, add this TXT record:
v=spf1 include:emailarray.com -all - If you already have one, add
include:emailarray.combefore the-allor~alltag.
| Type | Name | Value | TTL |
|---|---|---|---|
| TXT | @ or yourdomain.com | v=spf1 include:emailarray.com ~all | 3600 |
6.3. Webmail Record (Recommended)
This lets you access webmail.yourdomain.com to access your webmail. You can skip this step and access the Webmail here.
- Add this record:
| Type | Host / Name | Value / Points to | TTL |
|---|---|---|---|
| CNAME | webmail | webredirect.emailarray.com | 3600 |
- Please allow 30-40 minutes for the Webmail SSL status to update in your Admin Panel domain health page.
6.4. DKIM (Strongly Recommended)
DKIM helps your emails land in the inbox instead of spam.
- Go to Admin Panel → Domains
- Click the DKIM icon next to your domain
- Enable DKIM
- Copy the values provided: Host, Key
- Create a TXT record:
-
- Host → (value provided in Admin Panel)
- Value → (DKIM key provided)
-
| Type | Name (Host) | Value (TXT) | TTL |
|---|---|---|---|
| TXT | Provided Host by Admin Panel | Provided Key by Admin Panel | 3600 |
6.5. Autodiscover & Autoconfig (Recommended)
These make email setup automatic on devices like Outlook, iPhone, etc.
Add these two records:
| Type | Name | Value | TTL |
|---|---|---|---|
| A | autodiscover.yourdomain.com | 69.28.212.195 | 3600 |
| A | autoconfig.yourdomain.com | 69.28.212.195 | 3600 |
6.6. Wait for DNS updates
- Usually works within a few minutes
- Can take up to 1–2 hours
- SSL (Webmail / Autodiscover) may take up to 30–40 minutes
Then:
- Go back to Admin Panel → Domains
- Click Health status button
- Click Verify again
Allow a few minutes for the DNS to update
DNS records might take a few minutes to a few hours to update and propagate over the Internet. Once this is completed, you can access your Webmail by going to webmail.yourdomain.com (make sure you replace yourdomain.com with the name of your domain).
STEP 7: Send your first email
You can access your mail immediately via our Webmail. The Webmail doesn’t need additional setup, and you can access it from any computer, smartphone, or tablet without installing other applications.
-
Via your URL: Go to
webmail.yourdomain.com(if DNS setup is complete). - Via our Webmail Login URL.
-
Via Admin Panel: Click the Envelope Icon next to your user on the Users page
.
Congratulations, you have completed the setup of your email address!
What’s next?
On your phone: Basic and Enhanced mailboxes work with any app via IMAP (see IMAP guide). Enhanced mailboxes also support ActiveSync for syncing calendars and contacts (see ActiveSync guide).
Desktop apps: Connect to Thunderbird, eM Client, Outlook or Apple Mail easily. Follow our client setup guides here.
For Enhanced mailboxes only: Calendar and Contacts sync with CalDav and CardDav – for applications that support them, such as Thunderbird, mobile apps for calendar and address book
Getting Help
Switching to a new email provider can be intimidating. That’s why our Support Team is here to answer your questions. If you need help setting up your new email address, you can talk to our Support Team through chat or ticketing system. Our Support Team can also help you move your previous mailboxes, contacts, and calendars to your new one.
